
A house’s thermal envelope refers to the shell of the house that separates the air inside your house from the air outside your house.
Modern houses have significantly improved building efficiency standards, many of which are designed to improve a house’s thermal envelope. We want to keep the warm air inside in winter and outside in summer.
Draught proofing refers to the practice of plugging or stopping draughts and improving a house’s thermal envelope. Draught proofing is probably the most affordable and effective way to reduce our energy bills.
Sustainability Victoria suggests:
Up to 25% of winter heat loss from existing houses is caused by air leakage (also known as draughts). In fact 9 out of 10 homes in Victoria have unwanted draughts.
We calculated our annual heater bill is around $700, so that represents a possible $175 in savings per year from some simple steps.
The Quick Take:
- Draught proofing will be a logical first step for people looking to reduce energy bills
- Older houses especially are prone to a weak thermal envelope
- Draught proofing can be carried out either professionally or DIY – some steps are very simple
- Aside from the financial benefits and wasting less energy, draught proofing will improve the comfort of your home
Thermal Envelope
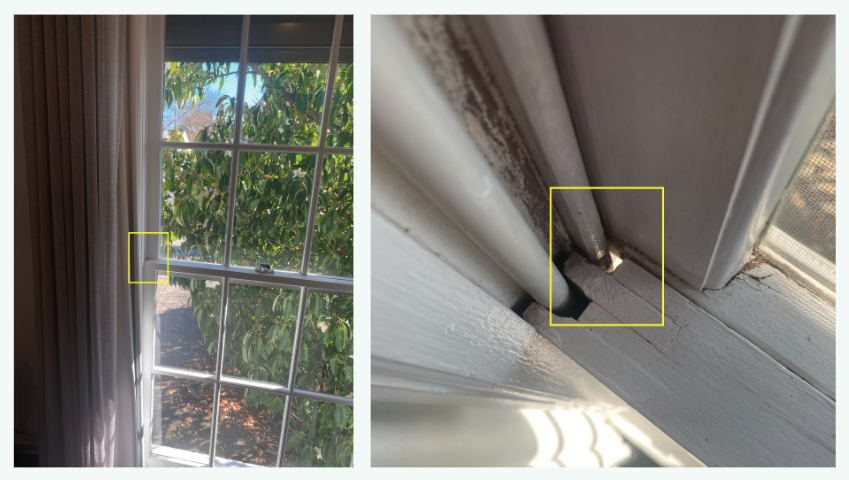
Common thermal envelope breaches include old air vents, gaps in doors, gaps in the trimmings around windows.

Older houses, like ours, have a weak thermal envelope. Indeed, our french windows are lovely, but you can see a direct line of sight outside.
Professional Draught Proofing
Professional draught proofing involves a home energy audit followed by an estimate or quote to carry out any works. An initial audit costs around $200 to $300 and should take between 2 and 3 hours. Follow up works might cost anywhere from $200 to upwards of $1,000.
At Powrhouse, we start by directing clients to DIY steps which will save money (see below). If professionals are required, we have relationships with trusted trades that we are happy to introduce.
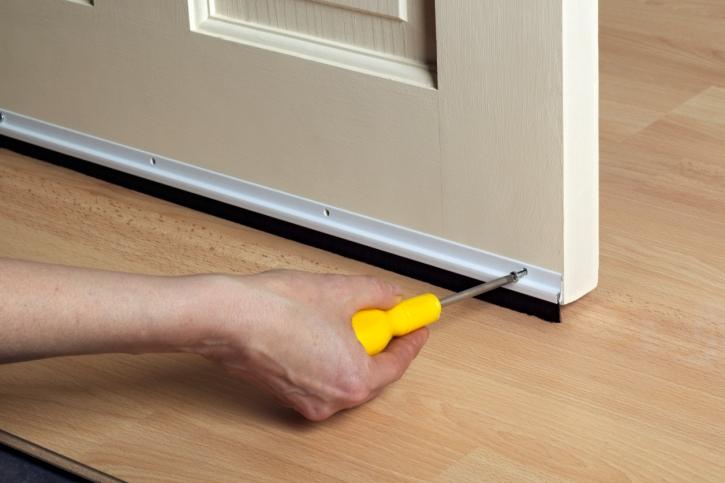
DIY Draught Proofing
There are a number of ways to conduct your own home energy audit. Trusted methods include holding matches near windows to see if the smoke is carried outside, holding paper near doors to see if the paper waves in the breeze and observing curtains for any movement.
A newer method is arguably simpler and easier – the thermal camera. A thermal camera uses infrared energy to highlight warm and cold areas.
Thermal cameras are often available for hire at local libraries (we love our libraries!).
Below are some links to libraries. People can still join these libraries even if they don’t live in the municipality.
Mornington Peninsula Libraries
We borrowed a FLIR thermal imaging camera from our local library in Balwyn.

After playing around with the camera, we suggest focussing on doors and windows. The photo below appears to show a leaky front door, the bottom left and bottom right of the door. We will buy some door seal and window seal to fix that up. We’ll also consider installing a blind near the front window.
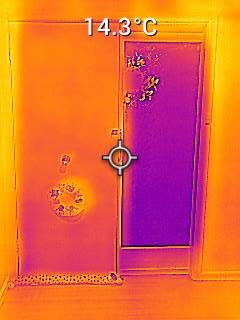
Please note the colours in the imaging are relative. For example, the shot below looks like the whole area is cold. The heating vent (bottom right) and kettle are in the shot, so everything else looks relatively cold.
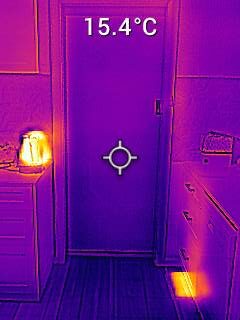
The lack of wall insulation is apparent in this photo. The blue areas are external walls with presumably no insulation. The curtains (just to the right of the pointer) appear to do a good job of keeping the heat in. You can also see our dog in the bottom right corner 🐶
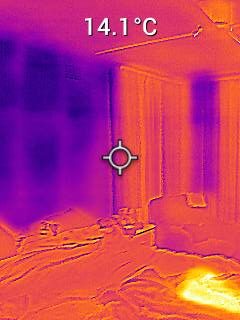
It’s okay to realise that some areas cannot be fixed. Installing wall insulation is a big, messy job. The photos above show the living room blinds doing a less than perfect job of keeping the heat in. But that’s okay. We don’t want curtains there – it’s about being Powrhouse Practical.
We will borrow the thermal camera again to both review the DIY actions we take and to perform another review. The link below has a great idea of using the thermal camera from the outside, to see heat escaping.
We suggest combining the thermal camera with a visual inspection around window frames. If you can, use a ladder or chair to review the tops of window frames for any gaps. These can easily be filled with gap sealer.
For more DIY tips, we found this YouTube clip helpful:
Conclusion
One of the things we like about draught proofing and insulation is that they are small changes that last a long time. While we love replacing gas hot water units with heat pump hot water units, and gas heating with electric heating, they come at a significant cost and they are only temporary. Appliances eventually fail and need to be replaced.
Draught proofing on the other hand usually comes at a low cost and, like underfloor insulation, lasts a very long time. A small investment now will lead to savings for a long time to come.
 Subscribe to Our